介绍
欢迎来到自然语言处理 (NLP) 的变革世界。在这里,人类语言的优雅与机器智能的精确性相遇。NLP 看不见的力量为我们所依赖的许多数字交互提供了动力。各种应用程序使用此自然语言处理指南,例如聊天机器人回答您的问题,搜索引擎根据语义定制结果,以及语音助手为您设置提醒。
在这本综合指南中,我们将深入探讨 NLP 的多个领域,同时重点介绍其正在彻底改变业务和改善用户体验的尖端应用程序。
了解上下文嵌入:单词不仅仅是离散的单位;它们的含义因上下文而异。我们将看看嵌入的演变,从像 Word2Vec 这样的静态嵌入到需要上下文的交互式嵌入。
Transformer 和文本摘要的艺术:摘要是一项艰巨的工作,不仅仅是文本截断。了解 Transformer 体系结构以及 T5 等模型如何改变成功摘要的标准。
在深度学习时代,由于层次和复杂,分析情绪具有挑战性。了解深度学习模型(尤其是基于 Transformer 架构的模型)如何善于解释这些具有挑战性的层,以提供更详细的情感分析。
深入了解 NLP
自然语言处理 (NLP) 是人工智能的一个分支,专注于教机器理解、解释和响应人类语言。这项技术将人与计算机连接起来,允许更自然的交互。在广泛的应用程序中使用 NLP,从简单的任务(如拼写检查和关键字搜索)到更复杂的操作(如机器翻译、情绪分析和聊天机器人功能)。正是这项技术允许语音激活的虚拟助手、实时翻译服务,甚至内容推荐算法发挥作用。作为一个多学科领域,自然语言处理 (NLP) 结合了语言学、计算机科学和机器学习的见解,以创建可以理解文本数据的算法,使其成为当今人工智能应用的基石。
NLP 技术的演变
多年来,NLP 已经有了显着的发展,从基于规则的系统发展到统计模型,最近又发展到深度学习。捕捉语言细节的过程可以从传统的词袋(BoW)模型到 Word2Vec,再到上下文嵌入的变化中看到。随着计算能力和数据可用性的提高,NLP 开始使用复杂的神经网络来理解语言的微妙之处。现代迁移学习的进步使模型能够改进特定任务,确保实际应用的效率和准确性。
Transformer 的崛起
Transformer 是一种神经网络架构,成为许多尖端 NLP 模型的基础。与严重依赖循环层或卷积层的前辈相比,Transformer 使用一种称为“注意力”的机制来绘制输入和输出之间的全局依赖关系。
Transformer 的架构由编码器和解码器组成,每个编码器都有多个相同的层。编码器获取输入序列并将其压缩为解码器用于生成输出的“上下文”或“内存”。 Transformer 的特点是其“自我注意”机制,该机制在产生输出时对输入的各个部分进行称重,使模型能够专注于重要的事情。
它们用于 NLP 任务,因为它们擅长各种数据转换任务,包括但不限于机器翻译、文本摘要和情绪分析。
具有 BERT 的高级命名实体识别
命名实体识别 (NER) 是 NLP 的重要组成部分,涉及将文本中的命名实体识别和分类为预定义的类别。传统的 NER 系统严重依赖基于规则和基于功能的方法。然而,随着深度学习的出现,特别是像 BERT(来自 Transformer 的双向编码器表示)这样的 Transformer 架构,NER 的性能得到了大幅提高。
谷歌的 BERT 是在大量文本上预先训练的,可以为单词生成上下文嵌入。这意味着 BERT 可以理解单词出现的上下文,这对于像 NER 这样上下文至关重要的任务非常有用。
使用 BERT 实现高级 NER
● 我们将受益于 BERT 通过使用其嵌入作为 NER 中的能力来理解上下文的能力。
● SpaCy 的 NER 系统基本上是一种序列标记机制。我们将使用 BERT 嵌入和 spaCy 架构来训练它,而不是通过常见的词向量。
import spacy
import torch
from transformers import BertTokenizer, BertModel
import pandas as pd

# Loading the airline reviews dataset into a DataFrame
df = pd.read_csv('/kaggle/input/airline-reviews/Airline_Reviews.csv')

# Initializing BERT tokenizer and model
tokenizer = BertTokenizer.from_pretrained("bert-base-uncased")
model = BertModel.from_pretrained("bert-base-uncased")

# Initializing spaCy model for NER
nlp = spacy.load("en_core_web_sm")

# Defining a function to get named entities from a text using spaCy
def get_entities(text):
    doc = nlp(text)
    return [(ent.text, ent.label_) for ent in doc.ents]

# Extracting and printing named entities from the first 4 reviews in the DataFrame
for i, review in df.head(4).iterrows():
    entities = get_entities(review['Review'])
    print(f"Review #{i + 1}:")
    for entity in entities:
        print(f"Entity: {entity[0]}, Label: {entity[1]}")
    print("\n")

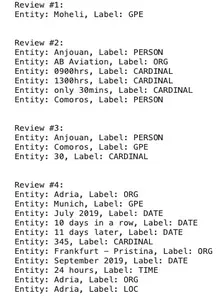
'''This code loads a dataset of airline reviews, initializes the BERT and spaCy models,
and then extracts and prints the named entities from the first four reviews.
'''
上下文嵌入及其重要性
在像 Word2Vec 或 GloVe 这样的传统嵌入中,无论其上下文如何,单词始终具有相同的向量描述。单词的多重含义没有得到准确的表示。上下文嵌入已成为规避此限制的流行方法。
与 Word2Vec 相比,上下文嵌入根据上下文捕获单词的含义,从而实现灵活的单词表示。例如,“岸边”一词在句子“我坐在河岸边”和“我去了岸边”中看起来不同。不断变化的插图产生了更准确的理论,特别是对于需要微妙理解的任务。模型理解以前机器难以理解的常用短语、同义词和其他语言结构的能力正在提高。
使用 BERT 和 T5 的 Transformer 和文本摘要
Transformer 架构从根本上改变了 NLP 的格局,使 BERT、GPT-2 和 T5 等模型的开发成为可能。这些模型使用注意机制来评估序列中不同单词的相对权重,从而对文本产生高度上下文和细微差别的理解。
T5(文本到文本传输 Transformer )通过将每个 NLP 问题视为文本到文本问题来概括这一想法,而 BERT 是一种有效的总结模型。例如,翻译需要将英语文本转换为法语文本,而摘要涉及减少长文本。因此,T5 易于适应。由于其统一的系统,训练 T5 具有各种任务,可能使用来自单个任务的信息来训练另一个任务。
使用 T5 实施
import pandas as pd
from transformers import T5Tokenizer, T5ForConditionalGeneration

# Loading the airline reviews dataset into a DataFrame
df = pd.read_csv('/kaggle/input/airline-reviews/Airline_Reviews.csv')

# Initializing T5 tokenizer and model (using 't5-small' for demonstration)
model_name = "t5-small"
model = T5ForConditionalGeneration.from_pretrained(model_name)
tokenizer = T5Tokenizer.from_pretrained(model_name)

# Defining a function to summarize text using the T5 model
def summarize_with_t5(text):
    input_text = "summarize: " + text
    # Tokenizing the input text and generate a summary
    input_tokenized = tokenizer.encode(input_text, return_tensors="pt",
    max_length=512, truncation=True)
    summary_ids = model.generate(input_tokenized, max_length=100, min_length=5,
    length_penalty=2.0, num_beams=4, early_stopping=True)
    return tokenizer.decode(summary_ids[0], skip_special_tokens=True)

# Summarizing and printing the first 5 reviews in the DataFrame for demonstration
for i, row in df.head(5).iterrows():
    summary = summarize_with_t5(row['Review'])
    print(f"Summary {i+1}:\n{summary}\n")
    #print("Summary ",i+1,": ", summary)
    print("-" * 50)

''' This code loads a dataset of airline reviews, initializes the T5 model and tokenizer,
 and then generates and prints summaries for the first five reviews.
'''
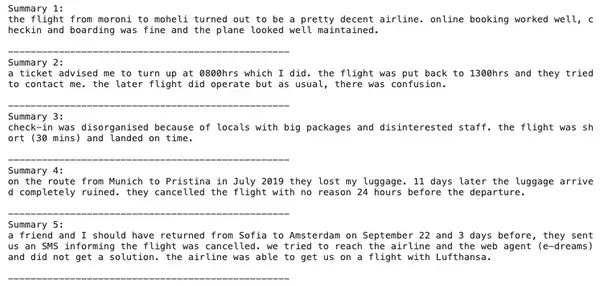
在成功完成代码后,很明显,生成的摘要简洁而成功地传达了原始评论的要点。这显示了 T5 模型理解和评估数据的能力。由于其有效性和文本摘要能力,该模型是 NLP 领域最受欢迎的模型之一。
具有深度学习见解的高级情绪分析
除了将情绪简单地分类为积极、消极或中性类别之外,我们可以更深入地提取更具体的情绪,甚至确定这些情绪的强度。将 BERT 的强大功能与其他深度学习层相结合,可以创建一个情感分析模型,提供更深入的见解。
现在,我们将研究数据集中的情绪如何变化,以确定数据集评论功能中的模式和趋势。
使用 BERT 实施高级情绪分析
数据准备
在开始建模过程之前,准备数据至关重要。这涉及加载数据集、处理缺失值以及将未处理的数据转换为情绪分析友好的格式。在本例中,我们会将航空公司评论数据集中的 Overall_Rating 列转换为情绪类别。在训练情绪分析模型时,我们将使用这些类别作为目标标签。
import pandas as pd
# Loading the dataset
df = pd.read_csv('/kaggle/input/airline-reviews/Airline_Reviews.csv')
# Converting 'n' values to NaN and then convert the column to numeric data type
df['Overall_Rating'] = pd.to_numeric(df['Overall_Rating'], errors='coerce')
# Dropping rows with NaN values in the Overall_Rating column
df.dropna(subset=['Overall_Rating'], inplace=True)
# Converting ratings into multi-class categories
def rating_to_category(rating):
if rating <= 2:
return "Very Negative"
elif rating <= 4:
return "Negative"
elif rating == 5:
return "Neutral"
elif rating <= 7:
return "Positive"
else:
return "Very Positive"
# Applying the function to create a 'Sentiment' column
df['Sentiment'] = df['Overall_Rating'].apply(rating_to_category)标记化
文本通过标记化过程转换为标记。然后,模型使用这些令牌作为输入。我们将使用 DistilBERT 标记器,增强准确性和性能。我们的评论将转换为 DistilBERT 模型可以借助此标记器理解的格式。
from transformers import DistilBertTokenizer

# Initializing the DistilBert tokenizer with the 'distilbert-base-uncased' pre-trained model
tokenizer = DistilBertTokenizer.from_pretrained('distilbert-base-uncased')
数据集和数据加载器
我们必须实现 PyTorch 的数据集和 DataLoader 类来有效地训练和评估我们的模型。DataLoader 将允许我们对数据进行批处理,从而加快训练过程,而 Dataset 类将帮助组织我们的数据和标签。
from torch.utils.data import Dataset, DataLoader
from sklearn.model_selection import train_test_split

# Defining a custom Dataset class for sentiment analysis
class SentimentDataset(Dataset):
    def __init__(self, reviews, labels):
        self.reviews = reviews
        self.labels = labels
        self.label_dict = {"Very Negative": 0, "Negative": 1, "Neutral": 2,
                           "Positive": 3, "Very Positive": 4}

    # Returning the total number of samples
    def __len__(self):
        return len(self.reviews)

    # Fetching the sample and label at the given index
    def __getitem__(self, idx):
        review = self.reviews[idx]
        label = self.label_dict[self.labels[idx]]
        tokens = tokenizer.encode_plus(review, add_special_tokens=True,
        max_length=128, pad_to_max_length=True, return_tensors='pt')
        return tokens['input_ids'].view(-1), tokens['attention_mask'].view(-1),
         torch.tensor(label)

# Splitting the dataset into training and testing sets
train_df, test_df = train_test_split(df, test_size=0.2, random_state=42)

# Creating DataLoader for the training set
train_dataset = SentimentDataset(train_df['Review'].values, train_df['Sentiment'].values)
train_loader = DataLoader(train_dataset, batch_size=16, shuffle=True)

# Creating DataLoader for the test set
test_dataset = SentimentDataset(test_df['Review'].values, test_df['Sentiment'].values)
test_loader = DataLoader(test_dataset, batch_size=16, shuffle=False)

'''This code defines a custom PyTorch Dataset class for sentiment analysis and then creates
DataLoaders for both training and testing datasets.
'''
模型初始化和训练
现在,我们可以使用准备好的数据初始化 DistilBERT 模型以进行序列分类。在我们的数据集的基础上,我们将训练这个模型并修改其权重,以预测航空公司评论的基调。
from transformers import DistilBertForSequenceClassification, AdamW
from torch.nn import CrossEntropyLoss

# Initializing DistilBERT model for sequence classification with 5 labels
model = DistilBertForSequenceClassification.from_pretrained('distilbert-base-uncased',
num_labels=5)

# Initializing the AdamW optimizer for training
optimizer = AdamW(model.parameters(), lr=1e-5)

# Defining the Cross-Entropy loss function
loss_fn = CrossEntropyLoss()

# Training loop for 3 epochs
for epoch in range(3):
    for batch in train_loader:
        # Unpacking the input and label tensors from the DataLoader batch
        input_ids, attention_mask, labels = batch

        # Zero the gradients
        optimizer.zero_grad()

        # Forward pass: Get the model's predictions
        outputs = model(input_ids, attention_mask=attention_mask)

        # Computing the loss between the predictions and the ground truth
        loss = loss_fn(outputs[0], labels)

        # Backward pass: Computing the gradients
        loss.backward()

        # Updating the model's parameters
        optimizer.step()

'''This code initializes a DistilBERT model for sequence classification, sets
 up the AdamW optimizer and CrossEntropyLoss, and then train the model for 3 epochs.
'''
评估
我们必须在训练后评估模型对未经测试的数据的性能。这将有助于我们确定我们的模型在实际情况中的工作情况。
correct_predictions = 0
total_predictions = 0

# Set the model to evaluation mode
model.eval()

# Disabling gradient calculations as we are only doing inference
with torch.no_grad():
    # Looping through batches in the test DataLoader
    for batch in test_loader:
        # Unpacking the input and label tensors from the DataLoader batch
        input_ids, attention_mask, labels = batch

        # Getting the model's predictions
        outputs = model(input_ids, attention_mask=attention_mask)

        # Getting the predicted labels
        _, preds = torch.max(outputs[0], dim=1)

        # Counting the number of correct predictions
        correct_predictions += (preds == labels).sum().item()

        # Counting the total number of predictions
        total_predictions += labels.size(0)

# Calculating the accuracy
accuracy = correct_predictions / total_predictions

# Printing the accuracy
print(f"Accuracy: {accuracy * 100:.2f}%")

''' This code snippet evaluates the trained model on the test dataset and prints
    the overall accuracy.
'''
● 输出:精度:87.23%
部署
一旦我们对模型的性能感到满意,我们就可以保存模型。这使得跨各种平台或应用程序使用该模型成为可能。
# Saving the trained model to disk
model.save_pretrained("/kaggle/working/")

# Saving the tokenizer to disk
tokenizer.save_pretrained("/kaggle/working/")

''' This code snippet saves the trained model and tokenizer to the specified
directory for future use.
'''
推理
让我们使用样本评论的情绪来训练经过训练的模型来预测它。这说明了如何使用模型执行实时情绪分析。
# Function to predict the sentiment of a given review
def predict_sentiment(review):
    # Tokenizing the input review
    tokens = tokenizer.encode_plus(review, add_special_tokens=True, max_length=128,
    pad_to_max_length=True, return_tensors='pt')

    # Running the model to get predictions
    with torch.no_grad():
        outputs = model(tokens['input_ids'], attention_mask=tokens['attention_mask'])

    # Getting the label with the maximum predicted value
    _, predicted_label = torch.max(outputs[0], dim=1)

    # Defining a dictionary to map numerical labels to string labels
    label_dict = {0: "Very Negative", 1: "Negative", 2: "Neutral", 3: "Positive",
    4: "Very Positive"}

    # Returning the predicted label
    return label_dict[predicted_label.item()]

# Sample review
review_sample = "The flight was amazing and the staff was very friendly."

# Predicting the sentiment of the sample review
sentiment_sample = predict_sentiment(review_sample)

# Printing the predicted sentiment
print(f"Predicted Sentiment: {sentiment_sample}")

''' This code snippet defines a function to predict the sentiment of a given
review and demonstrate its usage on a sample review.
'''
● 输出:预测情绪:非常积极
NLP 中的迁移学习
由于迁移学习,自然语言处理(NLP)经历了一场革命,它使模型能够使用来自一项任务的先验知识并将其应用于新的相关任务。研究人员和开发人员现在可以针对特定任务(例如情感分析或命名实体识别)微调预先训练的模型,而不是从头开始训练模型,这通常需要大量的数据和计算资源。这些预先训练的模型经常在像整个维基百科这样的庞大语料库上进行训练,捕捉复杂的语言模式和关系。迁移学习使 NLP 应用程序能够更快地运行,所需数据更少,并且经常具有最先进的性能,从而为更广泛的用户和任务提供对高级语言模型的访问。
结论
传统语言方法和当代深度学习技术的融合,在快速发展的 NLP 领域迎来了前所未有的进步时期。我们不断突破机器可以用人类语言理解和处理的极限。从利用嵌入来掌握上下文的微妙之处,到利用 BERT 和 T5 等 Transformer 架构的强大功能。特别是迁移学习使使用高性能模型变得更加容易,降低了进入门槛并鼓励创新。正如主题所提出的那样,很明显,人类语言能力和机器计算能力之间的持续互动有望使机器不仅能够理解,而且还能够与人类语言的微妙之处联系起来。
关键要点
● 上下文嵌入允许NLP 模型理解与周围环境相关的单词。
● Transformer 架构显著提高了 NLP 任务的功能。
● 迁移学习可提高模型性能,而无需进行大量训练。
● 深度学习技术,特别是基于 Transformer 的模型,提供了对文本数据的细致入微的见解。
常见问题
问题 1.什么是 NLP 中的上下文嵌入?
答:上下文嵌入根据它们使用的句子的上下文动态表示单词。
问题 2.为什么 Transformer 架构在 NLP 中很重要?
答: Transformer 架构使用注意力机制来有效地管理序列数据,从而在各种 NLP 任务上实现尖端性
能。
问题 3.迁移学习在 NLP 中的作用是什么?
答:通过迁移学习减少了训练时间和数据需求,这使得 NLP 模型能够使用来自一项任务的知识并将其应用于新任务。
问题 4.高级情绪分析与传统方法有何不同?
答:高级情绪分析更进一步,使用深度学习见解来提取更精确的情绪及其强度。
原文地址:https://www.analyticsvidhya.com/blog/2023/09/advanced-natural-language-processing-nlp/
非常感谢大家的阅读,小Mo在这里祝你在末来的 Python 学习职业生涯中一切顺利!
后续小Mo会不定期更新书籍、视频等学习资源,以上这些书籍资料也可通过关注微信公众号免费获取哦!
欢迎关注我们的微信公众号:MomodelAl
同时,欢迎使用「Mo AI编程」微信小程序
以及登录官网,了解更多信息:Mo 人工智能教育实训平台
Mo,发现意外,创造可能
注:部分资源来源于互联网,若有侵权,请直接联系作者删除。




评论 (0)